As a Hungarian, I rejoiced when my favourite cookery show "The Great British Bake Off" chose to use a quintessential Hungarian cake for the technical challenge. With its several thin layers of sponge and challenging crunchy caramel topping can leave many bakers quaking in their boots. However, the end result is so visually appealing and delicious that it's worth the effort. Imagine my horror then, when the contestants served up some travesties that had hardly any resemblance to the original emblematic cake of Hungary. Even Mary Berry's version I felt was too blinged up and adding an extra small layer on top looked a bit too much. So I felt compelled to write a post that demonstrated the beauty of the original Hungarian cake designed by legendary baker Jozsef Dobos. "Dobos" also means "drummer" in Hungarian, but it's named after the baker, not the instrument.
 My recipe is mainly based on this lovely one by Vilmos Farkas. I've just changed a few things, reducing the quantity of the chocolate Swiss meringue buttercream (as I had way too much left over when using his quantities), and also I made some chocolate-dipped fudge balls for the top to decorate. He gives great advice on his video (if you understand Hungarian), and he also gives some lovely details about the life of the original baker Dobos, and tries to convince the reader of the value of making the original, six-layered cake. He reminds us that original Dobostorta was a much more modest affair than the modern-day 12-layer high show cake that you can find in Hungarian cake shops. This was because back in the 19th century when the cake was invented, sugar and cakes were a very special treat, and people only had very small slices. In fact, it is said that the original cake was split into 20 pieces, but I think that's quite difficult! His blog entry and video are very educational, but bless him, his English translation leaves something to be desired! So I hope my version will do justice for his recipe and make it easier to understand.


To make one 22 cm diameter cake:
Ingredients
Six sponge-sheets
6 eggs
100 g icing (powdered) sugar
100 g flour
35 g melted butter
Chocolate Swiss-meringue buttercream
176 g unsalted butter
13 g caster sugar
3 eggs
100 g icing (powdered) sugar
26 g cocoa mass
26 g cocoa butter
(I'm not sure whether the last two are necessary, I think it would be fine to replace it with 50 g extra dark chocolate)
200 g dark or milk chocolate
100 g flaked almonds
100 g flaked almonds
Caramel topping
150 g white caster sugar
Fudge balls (optional)
112.5 g unrefined or light brown caster sugar
100 ml double cream
12.5 g butter
1/2 tsp glucose syrup
1/2 tsp vanilla
150 g chocolate
To make the six sponge layers:
- Preheat the oven to 200 C. Prepare six sheets of baking paper with 22 cm circles marked out. Vilmos recommends to prepare the the sponges in two lots of three when cooking at home, in order to avoid the collapsing of the mixture while waiting for the first lot to cook.
- Beat the egg yolk with 50 g icing sugar and whip up the egg whites with the remaining 50 g icing sugar to soft peaks.
- Carefully fold the two together, being careful to avoid knocking out the air from the egg whites.
- When the egg yolks and whites are almost mixed, fold in the flour, and then the melted butter
- Spread the batter thinly onto the marked 22 cm circles. Try to make the circles as even as you can, but don't push on them or fiddle about with them for too long, in case you knock out the air.
- Bake in the oven for 10 - 12 minutes, until light brown. Careful, because they can burn very quickly, particularly at the edges!
- When the sponges are baked, cut along the edges with a knife to make even circles, in case any of them need it. Rest on a wire rack to cool.
To make the Swiss meringue buttercream
- Take the butter out of the fridge, so that it is cold, but not too warm when you add it later.
- Melt the cocoa mass and cocoa butter (if using) with the dark chocolate, using a bain marie, or on 30 second blasts in the microwave.
- Beat the 176 g butter until soft and creamy with the 13 g caster sugar.
- Heat the 3 eggs with the 100g powered sugar on a bain marie with continuous stirring with a whisk, to stop it burning on one side. Don't allow the eggs to go above 80 degrees C!
- When the eggs reach the correct temperature (and therefore pasteurisation has occurred to make the eggs safe to eat), transfer to a free-standing mixer, and beat on medium-high speed for about 10 minutes or until the bowl is cool enough to touch.
- Turn the mixer speed down and add the cool butter bit by bit and then pour in the (not too hot) melted chocolate in to mix. If the mixture starts to separate, cool in the fridge for 15 - 30 minutes and then beat again.
- To assemble the cake, it can be useful to use the cake tin to keep the even shape of the cake. Place one of the sponge sheets on the bottom, and then add a layer of the chocolate SMB a similar thickness to the sponge sheet. Continue with four more of the sheets, and save the sixth sheet for the next step. Cover the 5th layer with chocolate SMB. Then take out the cake from the pan and cover the sides with more chocolate SMB and press on a layer of flaked almonds or other nut of your choice if desired.

To make the crunchy toffee topping:
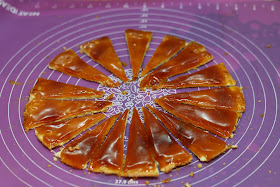
- Then melt the 150 g white caster sugar in a pan, until melted and turned a nice caramel colour (roughly 150 degrees C, but be careful not to burn it!). Normally I don't like to use refined white sugar, but Vilmos points out in his video that white sugar produces better results for the caramel, and even goes as far as suggesting to use sugar cubes, which tend to have the most refined sugar, to give the clearest, most flawless toffee finish to this topping.
- Pour over the final sixth sheet of sponge, spreading as evenly as possible whilst still hot, using a greased knife (see the video for how best to do this). Don't try to do it too fast in case you end up burning yourself with the sugar. If it's not quite perfect, then you can always pop it back into the oven for a minute or so to soften up the toffee to make it spreadable.
- Whilst the toffee is still warm, divide the circle into 16 pieces, marking it with a knife, then leave it to cool. Once set, use these marking to cut all the way through the sponge on a chopping board.

To make the fudge balls
- Place all the ingredients except the vanilla in a saucepan and put on a medium-high heat. Stir until the sugar has dissolved, but when the bubbles start to appear, stop stirring and leave the fudge to heat up.
- Once the fudge has reached 116 degrees C, dip the saucepan into a bowl of cold water to stop the cooking process. When the fudge goes below 110 degrees C, start beating the fudge until it starts to become grainy and loses its shine.
- When the fudge reaches about 70 - 80 degrees C, add the vanilla, and beat into the mixture
- When the mixture reaches about 60 - 70 degrees C, it will start to want to set, so take it out onto a work surface, and then roll 16 even size balls and leave them to set. I measured out each ball at about 7 g before rolling.
- If you want to cover them in chocolate, temper the chocolate and then dip the fudge balls into the chocolate with a fork or spoon chocolate over the top. Leave to set
- Use the fudge balls, or if not using them, pipe small balls of the buttercream at 16 points on the edges of the cake, and use them to tilt the toffee shards in a radial fashion


No comments:
Post a Comment
What do you think of this recipe?