When we were planning a big leaving party for a big minion fan friend, I knew exactly what kind of cake I had to make! I work in a lab, so a lot of my bakes are science themed, and I'd previously made him a science minion cupcake modelled on his own lab coat for his birthday, so I knew it was time to scale up the image to make a real impression.
 |
| Science minion cake complete with labcoat, pipette and publication! |
For this cake, I mainly worked off Ann Reardon's How to Cook That video of the 3D minion cake, adjusting the size and changing the design to a science theme. I would definitely agree that you need to make a template, and make sure you measure according to your scale accurately (because I made a mistake at one point!). I also scaled mine down a bit compared to hers because I did the stats and it would have taken up a ridiculous amount of eggs and flour, and there was no way we would have eaten it all, even with 6 adults and 2 young children expected to attend the farewell party. So I scaled mine down to four 6 inch cakes, one of which was spherical, baked in a bowl. I still used up more ingredients than I ever have for any other cake before.
In terms of structure, I was happy to have my minion sitting, so I didn't have to go through the drilling, etc. that Ann did to make her minion stand. However, having looked at other websites that did minion cakes, it was obvious that at least one cake board inside to support the weight. I used a few of my cake pop lollipop sticks as dowelling to support the board.
Ingredients
Four tiers of 6 inch cakes
I used my regular chocolate cake recipe from Lindy Smith's The Contemporary Cake Decorating Bible, but it's up to you, any 6 inch cake recipe of your choice would work
Make FOUR cakes (three round and one spherical) each with the following ingredients:
4 eggs
Make FOUR cakes (three round and one spherical) each with the following ingredients:
4 eggs
1755 g (6 oz) plain chocolate
115 g (4 oz) unsalted butter
115 g (4 oz) unsalted butter
75 g (3 oz) caster sugar
25 g (1 oz) icing (confectioner's) sugar
115 g self-raising flour
Buttercream of your choice to sandwich the tiers together. I used caramel buttercream.
25 g (1 oz) icing (confectioner's) sugar
115 g self-raising flour
Buttercream of your choice to sandwich the tiers together. I used caramel buttercream.
Modelling Chocolate
1 kg/36 oz white chocolate
280g/16 tablespoons glucose/corn syrup
4 tbsp water(I used an incredible amount of modelling chocolate for this, maybe even more than what I listed here, but I always make up my modelling chocolate in 250 g worth of chocolate at a time, since it is easier to work with smaller amounts, and the chocolate takes more time to set in large pieces)
250 g milk chocolate
4 tablespoons glucose/corn syrup
1 tbsp water
Black food colouring
Silver food colouring powder
White food colouring powder
Other decorations
4 crunchie bars, or chocolate bar of your choice of a suitable size and robustness to make the arms and legs!
white chocolate
To make the four chocolate sponge cakes:
- Preheat oven to 180 degrees Celsius/350 degrees Fahrenheit/Gas 4. Grease and line tin with baking parchment/greaseproof paper. For the top of the minion's head, you don't need to buy a spherical cake tin, I just used a small round mixing bowl.
- Melt chocolate in heatproof bowl over hot water or in the microwave. Cream the butter and sugar together either by hand, with a hand mixer or a food processor in a large bowl until light, fluffy and pale
- Separate the eggs. Gradually add the egg yolks and then melted chocolate to the butter and sugar and mix well. In a separate bowl, whisk the egg whites until they form soft peaks (use a clean metal bowl for this if possible, egg whites will not form peaks if there is any fat/water present). Gradually whisk in the icing (confectioner’s) sugar into the egg whites
- Sift the flour into another bowl and using a large metal spoon, fold the flour alternately with the egg whites into the chocolate and egg mixture
- Transfer mixture into lined bakeware and bake for approximately 45 - 60 minutes. When the cake is baked it will be well risen, firm to the touch and a skewer inserted into the centre will come out clean.
- Allow the cake to cool completely whilst in the tin. Leave the lining paper on, wrap in foil or place in airtight container for 12 hours before cutting as it allows the cake to settle and will be less likely to break when you come to cut it. If you are using modelling chocolate, it's also best to make it the night before you need it, so that the chocolate is able to set stably at room temperature.
- Once rested, carefully cut each cake in half, and start to sandwich together with your chosen buttercream. I put the cake board above the second tier (four layers). Check out some tutorial videos on YouTube on using dowelling to stack cakes if you're unsure how to do this. After stacking, my cake looked like this:
 |
| Cakes stacked with butter cream starts to form the Minion cake shape |
 |
| Crumb coat on the minion cake prior to adding the modelling chocolate |
 |
| Place yellow modelling chocolate over the top of the head up to the line where the goggles will be. I often use a pizza cutter to get nice clean edges on my modelling chocolate |
Colour the milk chocolate to black to make the goggles and hands. I wrapped a small sheet of the black modelling chocolate around a large spice bottle to make the goggle for each eye, and used a knife and icing tip to put the details on. Then I brushed with silver food colouring powder (I find this produces a better result than painting on silver food paint).
 |
| Place the front chest piece of yellow "skin" onto the Minion Cake and prepare the goggles |
 |
| Pop the chocolate lab coat around the Minion |
 |
| Roll out a piece of black coloured milk modelling chocolate and cut a strip to be the goggle straps |
14. Break your chocolate bars according to the size required by the template to have an appropriate length of arms, legs and feet. Cover with the white modelling chocolate to create the sleeves of the lab coat, and colour some of the white modelling chocolate blue to make the overalls (which would be under the lab coat for the minions). Cover two small pieces with the black modelling chocolate to make the feet.
 |
| Place on the goggles, securing with lollipop sticks |
 |
| Cut a hole in the yellow modelling chocolate layer to create a mouth for the minion |
Tint some of the white chocolate with pink food colouring to make the tongue, fashion some teeth out of the white chocolate and some of the black milk modelling chocolate to give depth to the inside of the mouth:
 |
| Mouth complete on the minion cake |
16. Roll small amounts of the black milk modelling chocolate very thinly to make individual hairs. Leave them to cool after handling so that they harden somewhat. Poke holes on the top of the head using a cocktail stick, in which to place the hairs.
 |
| Make holes with a cocktail stick on the top of the head in which to place the modelling chocolate hair strands |
17. Extra decorations: I made a few extra bits and bobs to really personalise the cake for my friend. I covered a square cake board with remaining white modelling chocolate tinted blue and attempted to do a bit of Chinese writing (although not very successfully as you can see!). The characters below say "Farewell Yingzhou"
 |
| "Farewell Yingzhou" |


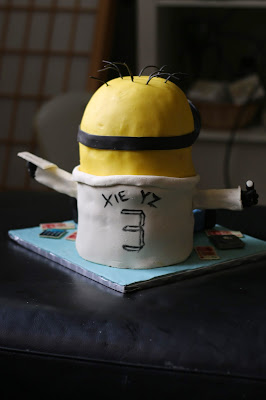 |
| The back was decorated in the same style as my friend to whom we were saying goodbye. He had doodled his name and basketball number on the back of his lab coat |
 |
| Attempting to transport the cake in a cardboard box proved quite difficult, and a lot of his hair broke off! |
 |
| Farewell Yingzhou! |

 |
| "Boy, science really makes you lose your head sometimes!" |
No comments:
Post a Comment
What do you think of this recipe?